Tuesday 28 June 2016

Sharing Wifi network through Laptop or PC using built-in WiFi or USB Wifi Lan Card

Hey Guys. Today I'm gonna tell you about throwing wifi signals just from your PC using Hotspot.

Problem: If have to share data between PC and my Smart Phone using Share-It or Feem-Wifi or through any other software and you want to share data at high speed. Then there's a possibility to turn-on your hotspot just from your PC. Then your mobile will find wifi network and will able to connect with it. Then the software like Share-it can be able to transfer data between your Smart Phone and PC.

Pre-Requistes: Built-In wifi device or USB Wifi device (use to connect with wifi networks),        Windows 7, Windows 8, Windows 8.1 or Windows 10
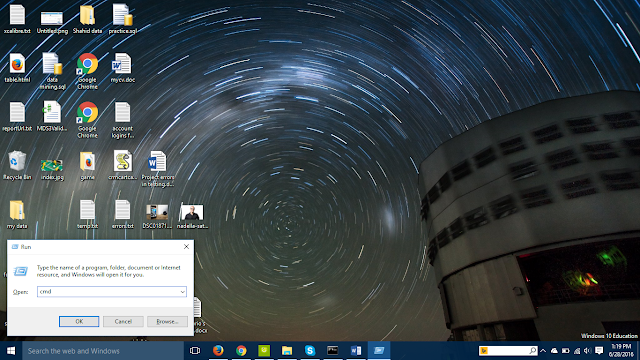
Step 1: 
           Open Command prompt using Window + R key. as given in following print shot. If you're Windows 7 user then you have to open it using Administrator.
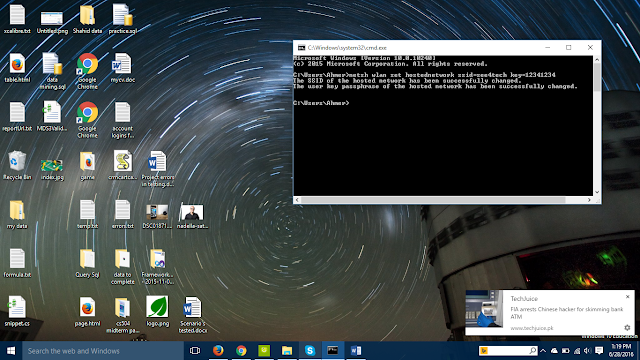


Step 2:
            Now in Cmd write the following command as in print shot and press enter. It will set name and password for your wifi network through which other devices will be connect.

netsh wlan set hostednetwork ssid=see4tech key=12341234


Step 3:
          Now you've to share you wifi network, for which you've to enter the following command as follows.

netsh wlan start hostednetwork


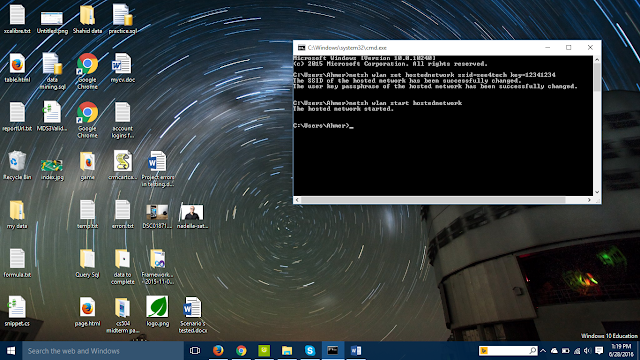
Your wifi is enabled now. You can search it in your mobile or other laptop but not in the same laptop. I'm able to find it as given in the following print shot.


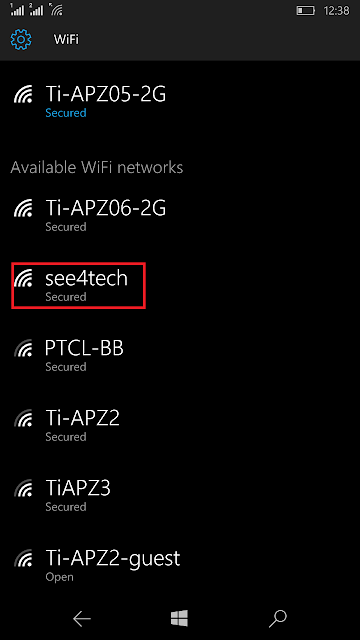
And I'm able to connect with it. Hurrah!
Now I can send music, movies or any other data using third party software's.

Step 4: 
          If you wan to stop sharing network. Then you've to write the following command as given in following print shot.

netsh wlan stop hostednetwork


Hope you enjoy! Get in touch for more awesome posts like this. If you have any query feel free to contact me through syedahmer66@hotmail.com. Allah hafiz

Thursday 30 July 2015

Sharing WIFI Internet Through LAN Cable

Hello Everyone, Assalam-o-Alaikum. Hoope, you're all fine. Today I 'm going to tell you about how to share WIFI connected Internet through LAN cable.

Step 1: The PC from you want to share WIFI internet, Right click on WIFI Signals icon located in System Tray. and then click on Open Network and Sharing Center.


Now Click on Wifi.


Now Click on Properties.


Now Click on sharing tab located on top.


Tick all Checkboxes and Press OK.


It will show you some configurations, Click yes.


Now Internet sharing through LAN cable is enabled.
Connect cable with your PC in which you want to enable Internet.
Hope So, you enjoyed. If you've any queries. Please comment.

Monday 27 July 2015

Writing First Application in Asp.net MVC 5

Assalam-o-Alaikum Every one, Today we will learn how to make Simple Web Application in Asp.net MVC 5.
Tool Needed: Visual Studio (2013 or later)

First Open Visual Studio. Click on File > New Project.
In New Project Window expand Visual C# from left and then click on Web. You will find Asp.net Web Application in the right pane window. Select it, Write your app name, Select path to save and Finally click on Ok.


Now Select Empty Template from next Window and also Check MVC. and click on Ok.


Now We will Develop a page which will Take User Name and radius as input and calculate Circle Area for that user and displays on the web browser.
So
Right Click on Controller > Add > Controller. 


Now Click on MVC 5 Controller Empty. and click on Add.


Now Write your on name and remember always write Controller as suffix after writing your Controller name. as like


Controllers has actions which define the URL Path. 
And Action by default Visual Studio will add to your controller named as Index.
So here's question is what will be the URL to access this action?
The Answer is 
The URL will be /Test/Index
Here's Test is your Controller Name and Index is your Action name.

So when i write this url in browser request goes to controller to the specific action. we write in it's body Return View();
Which means it will return a View. In our case we don't create this action View. We've to create it's View.


As I mentioned earlier View Requires Model. So we've to create Model First. In this View Page i want to take Username and Radius. So I should have two properties in our model Class. 
Let's make a Model Class. 
Right Click on Models Folder > Add > Class.
Write Class name and click on ok.


So Now in this Class I Added two properties as following below


So, We're ready to create our View. Right click on Index action located in Test Controller. And Click on Add View.


Now Select All as following. Remember View Name should be same as the name of Action.


It will Create Our Index Action View automatically and add some basic HTML code. and also include our model class at the top of the page.
We're working on Asp.net Razor Syntax which is latest. And The Extension for our View is .cshtml (CSharp Html).


If you got Error under Layout. Then you can solve it as follows otherwise skip the following steps. And Jump to Continue Section.

Right Click on SimpleTutorial.UI Project and click on Manage Nuget Packages.


Then Search on top right text box Asp.net MVC
And then install Asp.net MVC (Internet Required)


Then Click I Accept if Prompt and it will automatically install.


Now Build the solution. Use Short Key Ctrl+Shift+B.

Continue:  Now We want to create a form which contains two Text boxes to store data and will post it to another action.
Let's do it. add some code in our Index.cshtml file as i 'm writing.


We Created a form which will post an object of our model class after taking data from user through text boxes made for specific Model property. When we click on Calculate Area Button our Model object will be posted to Index Action in Test Controller which takes HttpPost Request.

Now Let's make another Action with HttpPost Request. Got To Test Controller and add another one with taking TestModel obj as a parameter. We've to resolve TestModel refrence.


Now We calculate Area here and return data back to browser as Json.


So Now we 're done. Let's test it.

Go to index.cshtml file and right click anywhere and click on view in Browser.


Now Write your username and radius and click on Calculate Button.


It will return your username and Calculated Area back. So Try it by yourself. Thanx for reading. I will be here with new post on Asp.net soon In Shaa Allah.


Understanding the MVC framework working in Asp.net MVC 5

Hello Guys, Hope you 're all fine. Today we'll learn about What is MVC in Asp.net.

Tools Needed: Visual Studio (2012 or later)

MVC is a framework which Microsoft has adopt to develop efficient Web Application. Let's try to understand it, what is actually the functionality hidden behind it.

If a user write URL in the browser as www.see4tech.blogspot.com, the request goes to Controller (The Mega Mind), then Controller decides that which Page should be shown on to the browser. The Model take a great part. As Page needs some data to show. Controller collects data from the Database, Web Api's blah blah blah, stores it in Model and give it to the View. So Page gets data from controller and shows in the browser.

The Following picture describes a visual structure of working of MVC.

MVC Structure

Windows 10 Arrival

Hurrah 1 day to go. Feeling Amazing!!!